


![[Must-have] Knitting Yarn and Wire Set - Caydo](http://www.caydo.com/cdn/shop/files/3_4c349a4b-7e4d-4fa8-b6df-6561cf08410c.jpg?v=1731059827&width=298)
![[Must-have] Knitting Yarn and Wire Set - Caydo](http://www.caydo.com/cdn/shop/files/1_c1a8ec5f-79f5-4c02-b655-aaba689678cf.jpg?v=1731060862&width=298)


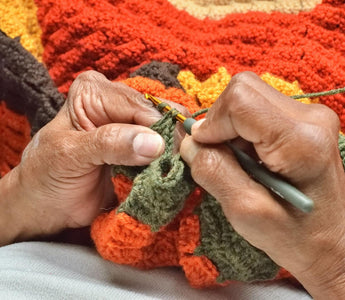
Learning how to crochet a blanket is simpler than you might imagine, making it a perfect first project for beginners.
With just basic supplies—a hook and yarn—you can create something both beautiful and functional. The repetitive motion of creating each stitch not only builds your blanket row by row but also provides a calming, meditative experience after a hectic day.
Even if you've never crocheted before, simple stitches like single or double crochet work up quickly, transforming your yarn into a cozy treasure.
Ready to create a handmade heirloom that will keep you warm for years to come? Read on to discover exactly how to get started!
Before You Start Your Crochet Blanket
Preparing for your first crochet blanket project is exciting! Taking time to gather the right materials will make your crocheting experience more enjoyable and successful.
Choosing the Right Yarn for Your First Blanket
When starting a blanket project, yarn choice matters a lot. For beginners, medium-weight yarns (worsted or DK weight) are perfect because they're easy to work with and see your stitches.
Recommended Yarn Types:
- 100% acrylic yarn (ideal for washable blankets)
- Cotton yarns (Soft and comes in many colors)
- Polycotton yarns (Durable, soft and shiny)
Look for yarn that feels nice in your hands. You'll be touching it for hours! Avoid very dark colors for your first project as they make it harder to see your stitches.
Check the yarn label for how many skeins you'll need. A throw blanket typically requires 8-12 skeins depending on size and pattern.
Make sure to buy all your yarn at once to ensure the same dye lot, which prevents color differences.

Your hook size should match your yarn weight. Most medium-weight yarns work well with hooks sized H/8 (5mm) to J/10 (6mm).
Hook Materials:
- Aluminum: slick, fast working
- Plastic: lightweight, good for beginners
- Ergonomic: comfortable grip for long sessions
Try hooks with comfort grips if you plan to crochet for long periods. These reduce hand strain and make crocheting more comfortable.
For blankets, slightly larger hooks create a softer, drapier fabric. Don't worry about getting the fanciest hook right away. Start simple and upgrade later if you enjoy the craft.
Supplies Every Blanket Maker Needs
Beyond yarn and hooks, a few basic tools will make your blanket project go smoothly.
- Scissors (sharp ones just for yarn)
- Tapestry needles (for weaving in ends)
- Stitch markers (to mark important spots)
- Measuring tape (to check your blanket size)
- Row counter (helps track where you are)
Consider getting a printed pattern or saving it on your phone/tablet for easy reference.
Don't forget some basic comfort items like good lighting and a comfortable chair. Your back will thank you!
A small notebook helps track any pattern adjustments or notes about your progress.
Common Crochet Blanket Stitches
Choosing the right stitch for your blanket can make your project more enjoyable and create the perfect finished piece.
Different stitches create different textures, warmth levels, and work up at different speeds.
Single Crochet Stitch for Dense, Warm Blankets
The single crochet (SC) is a basic stitch that creates a tight, dense fabric. This makes it perfect for warm, cozy blankets that will keep you snug on cold nights.
To make a SC, insert your hook into the stitch, yarn over, pull through the stitch (2 loops on hook), then yarn over and pull through both loops. That's it!
SC blankets take longer to make because the stitches are short. But the result is worth it!
The tight weave prevents gaps and helps your blanket hold its shape. This stitch is great for baby blankets because it creates a sturdy fabric that can withstand lots of washing. You can add texture by working in the back loops only.
Double Crochet for Quick Blanket Projects
Double crochet (DC) is a taller stitch that works up much faster than SC. It's perfect when you want to finish a blanket quickly!
To make a DC: Yarn over, insert hook into stitch, yarn over, pull through stitch (3 loops on hook), yarn over, pull through 2 loops, yarn over, pull through remaining 2 loops.
The DC creates a looser, more flexible fabric with a nice drape. This stitch is great for lightweight throw blankets.
Because it works up quickly, DC is perfect for gift blankets when you're short on time. Many beautiful patterns use DC combined with chains to create lacy patterns.
Half Double Crochet for the Perfect In-Between
The half double crochet (HDC) sits right between SC and DC in height. It gives you the best of both worlds - warmer than DC but works up faster than SC.
To make a HDC: Yarn over, insert hook into stitch, yarn over, pull through stitch (3 loops on hook), yarn over, pull through all 3 loops at once.
HDC creates a medium-density fabric with a unique texture. The ridge that forms on the back of HDC work adds interest to your blanket.
This stitch is versatile! It's great for blankets of all sizes, from baby blankets to king-size afghans. Many beginners find HDC easier to maintain tension with compared to DC.
Step-by-Step: How to Crochet a Simple Blanket

Creating your first blanket is easier than you might think! With just a few basic stitches and some patience, you'll be wrapping up in your handmade creation in no time.
Making Your Starting Chain the Right Length
The foundation of your blanket begins with your starting chain. To make it the right length, decide how wide you want your blanket first.
For a baby blanket, about 100 stitches works well. A throw blanket needs around 150-200 stitches. For a twin bed size, aim for 225-250 stitches.
Use stitch markers to mark every 25 or 50 stitches. This helps you keep count when making a long chain.
If you mess up counting, don't worry! Just undo and try again.
The texture of your blanket depends partly on how tight you make this first chain. Try to keep your tension even - not too loose, not too tight.
Remember that different stitch patterns need different multiples. Some patterns need chains in multiples of 3 plus 1, others might need multiples of 2.
First Row Tips: Getting a Straight Edge
The first row is super important for setting up a straight edge. Count carefully as you work across your chain.
Start with a 3 chain loop if you're doing double crochet stitches. This counts as your first stitch! Many beginners forget this and end up with wonky edges.
Put a stitch marker in the very first and very last stitch of each row. This visual reminder helps prevent accidentally increasing or decreasing stitches.
Work into the correct loops of your chain. Usually, you'll work under both loops, but check your pattern to be sure.
Take it slow on this first row. It's the trickiest part, but after this, it gets much easier!
Building Your Blanket Row by Row
After your first row, you'll find a rhythm as you build up your blanket.
Start each new row with a turning chain—usually 1 chain for single crochet or 3 chains for double crochet.
Always count your stitches in each row. You should have the same number as your starting chain (minus any turning chains). This keeps your edges straight.
Try to maintain even tension throughout. Your hands might get tired, so take breaks!
Uneven tension can make your blanket look wavy.
To change colors, finish the last stitch of a row, but when you have two loops on your hook, yarn over with the new color to complete the stitch.
Consider the stitch count for different textures.
Simple stitches like single crochet create dense, warm blankets. Double crochet works up faster but creates a looser fabric.
How To Tell When Your Blanket is Done
Your blanket is done when it reaches your desired length. For baby blankets, 30-36 inches is standard. Throw blankets are usually 40-50 inches long.
Check if your blanket is a good size by laying it out flat. Does it look right to you? Trust your eye!
The texture should be consistent throughout. If some areas look tighter or looser than others, you might want to block your blanket when finished.
Don't forget to fasten off securely. Cut your yarn leaving a 6-inch tail, pull through the last loop, and weave in all loose ends.
Once you've reached your target size and are happy with how it looks, celebrate!
Creating a Granny Square Blanket

Another popular approach to crochet blankets is making granny squares. This method is perfect for beginners as it breaks your project into manageable sections.
Start by mastering one basic granny square pattern - typically made with clusters of 3 double crochet stitches separated by chain spaces. Work in rounds until each square reaches your desired size (usually 5-6 inches).
For a baby blanket, make 16-25 squares (arranged 4×4 or 5×5). A throw needs about 48 squares (6×8 arrangement). Keep a notebook to track your progress!
Work all squares in one color for a classic look, or experiment with different color combinations for each square. Many beginners find using two contrasting colors easiest to start.
Once complete, block your squares by lightly spraying with water and pinning to exact measurements on a foam board. This ensures they're all uniform in size.
Join squares using whip stitch (easiest for beginners), slip stitch (creates a ridge), or single crochet join (most durable). Work from right to left, connecting one edge at a time.
Finish with a simple border around the entire blanket - even a single round of single crochet will give your project a polished look.
Finishing Your Crochet Blanket
Now that you've finished the main part of your blanket, it's time to give it those professional finishing touches. These final steps will make your blanket look complete and help it last for years.
Weaving in Ends So They Don't Come Loose
Grab your scissors and a tapestry needle (also called a darning needle) for this important step. Cut your final yarn tail, leaving about 6 inches to work with.
Thread the yarn end through your tapestry needle. Weave the end back and forth through the stitches of your blanket, going in different directions. Try to weave through at least 3-4 inches of your work.
Don't pull too tight or leave it too loose. The goal is for the end to stay secure without changing the shape of your blanket.
For extra security, weave the end through the same path twice. Then trim any remaining yarn close to the blanket. Repeat this process for all your yarn ends.
Blocking Your Blanket for a Professional Look

Blocking helps your blanket lie flat and look more even. First, fill a tub with lukewarm water and add a little wool wash or mild soap.
Gently place your blanket in the water and let it soak for 15-20 minutes. Don't wring or twist it when you take it out.
Lay clean towels on a flat surface. Place your wet blanket on the towels and gently shape it to the right size. Use rust-proof pins to hold it in place if needed.
Let your blanket dry completely before removing the pins. This might take 1-2 days depending on the yarn and room temperature.
Level Up: Try Making Different Blanket Projects Now!
Ready to try something new after mastering your first crochet blanket? Crocheting a blanket is a rewarding project that combines creativity with practicality while producing something truly useful.
By following the steps outlined in this guide—from selecting the right yarn and hook to mastering basic stitches and finishing techniques—you've gained all the foundational skills needed to create your own cozy masterpieces.
For blanket makers serious about their craft, invest in a quality crochet hook set. The right tools make all the difference in your crocheting experience, reducing hand fatigue and helping you maintain consistent tension throughout your projects.
Frequently Asked Questions
What are the beginner-friendly steps to crochet a blanket with illustrations?
Start by choosing a simple stitch like single crochet or double crochet. These basic stitches are easy to learn and work up quickly.
Next, make a foundation chain that's as wide as you want your blanket. Add a few extra chains for turning.
Work your chosen stitch into each chain. At the end of the row, chain 1-3 stitches (depending on your stitch height) and turn your work.
Keep repeating rows until your blanket reaches the length you want. Remember to count stitches in each row to maintain an even edge.
Finish by weaving in all loose ends with a yarn needle. Many free patterns online include helpful step-by-step pictures to guide you.
What is the best type of yarn to use for a thick crochet blanket?
Bulky or super bulky yarn works best for thick, warm blankets. These yarns (weight 5 or 6) create plush blankets quickly since they work up fast.
Wool blends offer warmth but can be scratchy for some people. Acrylic yarns are budget-friendly, machine-washable, and come in many colors.
For extra coziness, try chenille or velvet yarns. They create super soft blankets perfect for snuggling.
Remember to check the yarn label for care instructions. Some specialty yarns need special washing or may shed over time.
Is there a way to crochet a large blanket without joining pieces?
Yes! You can make a large blanket in one piece by working in rows across the entire width. This approach eliminates seams completely.
Use a long crochet hook for wider projects. Some crocheters prefer Tunisian crochet with its long hook for one-piece blankets.
Consider lightweight yarns for big one-piece projects. Bulky yarns get heavy and can strain your wrists when working on large pieces.
Take breaks often when working on big projects. One-piece blankets can become heavy and uncomfortable to hold as they grow.
What are some tips for creating a soft and cozy baby blanket for a beginner?
Choose yarn labeled specifically for babies. Look for soft, washable options like cotton or certain acrylics marked "baby soft." Stick to simple stitches that create a tight fabric. Avoid large holes that tiny fingers might get caught in.
Make your blanket a practical size - about 30 by 30 inches works well for most uses. Smaller blankets are faster to finish too!
Always check for loose ends and secure them well. Babies tend to pull at threads, so safety is important. Consider using pastel colors or gentle patterns. These create a soothing blanket perfect for little ones.

