


![[Must-have] Knitting Yarn and Wire Set - Caydo](http://www.caydo.com/cdn/shop/files/3_4c349a4b-7e4d-4fa8-b6df-6561cf08410c.jpg?v=1731059827&width=298)
![[Must-have] Knitting Yarn and Wire Set - Caydo](http://www.caydo.com/cdn/shop/files/1_c1a8ec5f-79f5-4c02-b655-aaba689678cf.jpg?v=1731060862&width=298)


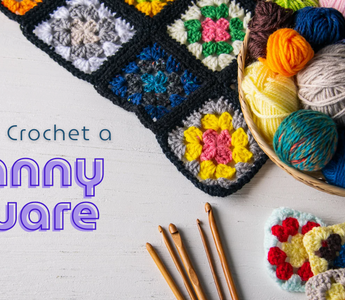
Learning how to crochet a granny square is the perfect way to start your crochet journey. This classic design is beginner-friendly, versatile, and a great foundation for projects like blankets, scarves, and clothing.
The best part? Granny squares allow for endless creativity—mix and match colors, experiment with patterns, and make each piece uniquely yours. Plus, they’re a fun, rewarding project that builds confidence as you go.
Ready to get started? Keep reading for step-by-step instructions, expert tips, and inspiring granny square ideas to help you create something beautiful!
What is a Granny Square?

A granny square is a classic crochet motif that works in rounds from the center outward, typically using clusters of double crochet stitches. These squares are versatile, beginner-friendly, and perfect for various projects.
Why Are Granny Squares So Popular?
- Great for beginners – They help you practice chaining, double crocheting, and working in the round.
- A timeless crochet tradition – Originally used to use leftover yarn, they have evolved into a staple for both beginner and experienced crocheters.
- Endless design possibilities – Customize with different colors, yarns, and patterns for a unique look.
Creative Ways to Use Granny Squares
- Blankets – Join multiple squares to create a cozy, colorful blanket.
- Garments – Make stylish cardigans, tops, or shawls.
- Accessories – Use granny squares for bags, hats, or pillow covers.
Granny squares remain a go-to crochet pattern because of their simplicity and flexibility. If you're ready to start, check out step-by-step tutorials and video guides to help you master this timeless technique!
Materials & Tools Needed for Crocheting a Granny Square
Having the right yarn and tools makes crocheting a granny square easier and more enjoyable. Here’s what you’ll need:
Choosing the Right Yarn

The yarn you select impacts the look, feel, and durability of your project. Popular choices include:
- Cotton – Durable, breathable, and great for warm-weather projects.
- Acrylic – Affordable, versatile, and easy to work with.
- Wool – Soft, stretchy, and ideal for cozy winter items.
💡 Tip: Worsted weight yarn (medium-weight) is great for beginners as it's easy to handle and creates well-defined stitches.
Choose solid colors for a classic look or multi-color yarn for added texture and interest.
Essential Crochet Tools
- Crochet Hook – A 4.5mm hook pairs well with worsted-weight yarn. Choose a comfortable grip to reduce hand strain.
- Stitch Markers – Helps keep track of rounds, especially for complex patterns.
- Scissors – A sharp pair ensures clean yarn cuts.
- Tapestry Needle – Used for weaving in loose ends for a neat finish.
- Yarn Organizer – Keeps your supplies tidy and portable.
With these materials and tools, you can start your granny square crochet project easily!

Check out Electric i-Cord Knitting Tricotin Machine i1 Pro Max + Essential Crochet Tools
Step 1: Creating the Foundation Ring
The foundation ring can be made using a magic or chain ring.
The magic ring involves making a loop, where the yarn end is pulled through the loop to form a ring. This method allows for a tight center, making it ideal for projects where a small hole is preferable.

Photo Source: @BellaCoco/Youtube
Alternatively, the chain ring method uses a slipknot to chain four and then join with a slip stitch to form a loop.
This method is simpler for beginners and results in a looser center. Choose the technique based on your preference for the center hole size and your skill level.
Step 2: Crocheting the First Round
Start by chaining three, which counts as your first double crochet. Next, work two more double crochets into the ring, forming your first cluster.

Photo Source: @BellaCoco/Youtube
Continue by chaining two, and then make three double crochets. Repeat this process three more times. Ensure each cluster is evenly spaced by chaining two between them.
Join the round with a slip stitch at the top of the starting chain. Keeping your stitches even and your tension consistent is key to a neat first round.
Step 3: Expanding the Square
You'll work with chain spaces and clusters to expand your granny square.
Each round starts by making three chains. Then, follow the pattern of working clusters in chain spaces from previous rounds.

Photo Source: @BellaCoco/Youtube
Always chain one or two between the clusters to maintain symmetry, adjusting according to your pattern.
Increase the size by adding corners consisting of two clusters separated by chain spaces. This keeps the distinctive square shape consistent across rounds.
Step 4: Changing Colors (Optional)
When you decide to change colors, start a new round by joining the new yarn with a slip stitch in any chain space. This seamless method prevents loose ends and ensures clean transitions.

Photo Source: @BellaCoco/Youtube
Hold the yarn ends close to work over them, tucking them into the following crochet stitches. This secures the ends, making for a tidy finish without long loose threads hanging off your square.
Step 5: Finishing the Granny Square
Once you have achieved the desired size, it's time to close off the ends. Weave in the yarn ends using a blunt needle, threading them through the backs of several stitches to prevent unraveling.

Blocking is highly recommended for a polished look and to ensure the square holds its shape.
Dampen the square slightly, shape it evenly, and pin it to a flat surface until it dries thoroughly. This step is crucial for a durable and well-shaped granny square.
📣 Watch Full Video on How to Crochet a Granny Square
Granny Square Variations & Advanced Techniques
Once you've mastered the classic granny square, try these variations to add texture, style, and creativity to your crochet projects.
1. Solid Granny Square – Dense & Warm

Photo Source: bellacococrochet
- It is ideal for cozy blankets and winter accessories.
- Uses double crochet (DC) clusters without chain spaces for a snug, hole-free design.
- How to make it: Start with a magic circle, then work continuous rounds with dc stitches for a structured, solid look.
2. Lacy Granny Square – Light & Decorative
- Perfect for lightweight shawls, airy blankets, or elegant designs.
- Features strategically placed chain spaces to create openwork patterns.
- How to make it: Increase chain spaces between clusters to add a delicate, lacy effect.
3. Sunburst Granny Square – Textured & Stylish

Photo Source: bellacococrochet
- Adds a modern, detailed look with extra dimension.
- Begins with a circular base using puff or cluster stitches before transitioning into a square shape.
- How to make it: Start with puff stitches in a round, then expand outward while maintaining the shape.
4. Hexagon & Triangle Variations – Unique Shapes
- Move beyond squares with hexagons or triangles for creative layouts.
- Hexagon Granny Squares: Made with six sides of double crochet clusters, great for honeycomb-style blankets.
- Triangle Granny Squares: Formed with three sides, perfect for geometric designs or decorative edges.
Why Try These Variations?
- Enhance your crochet skills with different stitch techniques.
- Create diverse patterns by mixing shapes and textures.
- Personalize your projects with unique styles for blankets, garments, and accessories.
Experiment with these granny square variations to add creativity and versatility to your crochet work!
Troubleshooting Common Granny Square Mistakes
Crocheting granny squares can sometimes lead to uneven edges, loose centers, or tension issues. Identifying and fixing these problems will help you create neater, more polished projects.
1. Fixing Uneven Edges & Tension Issues
Problem: Uneven edges or squares that don’t lie flat.
Solution:
- Maintain consistent tension throughout each round.
- Count stitches carefully to avoid accidental increases or decreases.
- Block your squares after finishing to shape them evenly.
2. Methods for Joining Granny Squares
Seamless joins create a professional, finished look. Different projects may require different joining techniques:
- Slip Stitch Join – Strong but slightly visible; ideal for bags and sturdy projects.
- Whip Stitch Join – Creates a soft, flexible connection; best for blankets and garments.
- Invisible Join – Blends seamlessly with the pattern for a nearly invisible connection.
💡 Tip: Test different methods on swatches to see which works best for your yarn and pattern.
3. Aligning Colors & Patterns
- Plan your color scheme in advance to maintain consistency.
- Use stitch markers to keep track of where each round begins, ensuring patterns align.
- Prevent color pooling by changing colors at consistent intervals or using strategic placement.
- For variegated yarns, ensure corner stitches match across squares to maintain a cohesive look.
By mastering these troubleshooting techniques, you can create granny squares that are even, well-joined, and beautifully coordinated, making your projects look polished and professional!
Helpful Resources 📚
You have plenty of resources available to help you master the art of crocheting granny squares. Whether you prefer written patterns or visual aids, you can find something to fit your learning style and improve your skills.
Video Tutorials for Visual Learners
Video tutorials are an excellent choice if you learn better through visual examples. Channels like Bella Coco on YouTube provide beginner-friendly guides on creating granny squares. These videos offer clear visuals on how to start your squares and adjust sizes according to your needs.
Watching a demonstration can be particularly helpful for grasping the fundamental techniques and timing of crochet stitches.
You can pause, rewind, and replay as needed, making it easier to master each step at your own pace.
Many tutorials incorporate tips for avoiding common mistakes, ensuring you can follow along confidently.
This interactive learning style enables you to visualize the process and apply it effectively to your crochet work.
📣 Also, Watch these video compilations on ▶️ How to Crochet Different Styles of Granny Squares
Frequently Asked Questions
Granny squares are a popular beginner project in crochet. Key questions often focus on ease, techniques, time commitment, yarn choice, and how to prevent issues like curling.
Are granny squares easy for beginners?
Yes, granny squares are easy for beginners. They use basic crochet stitches like chains and double crochets, making them simple to learn. Plus, they are repetitive, which allows beginners to practice and improve their skills quickly.
Do you use 2 or 3 chains for granny square?
Typically, you use 3 chains for the corners of a granny square. These chains act as the first double crochet of the corner space and help create the square's shape. Using 3 chains ensures the corners are well-defined and the square lays flat.
How long does it take a beginner to crochet a granny square?
For a beginner, it can take anywhere from 30 minutes to an hour to crochet a basic granny square. The time may vary depending on the individual's skill level and speed. With practice, the process becomes faster and more efficient.
What’s the easiest way to join multiple granny squares?
The easiest way to join multiple granny squares is by using the slip stitch or whip stitch method. Lay the squares side by side and stitch through the back loops of the edges to connect them seamlessly. This method is quick and creates a neat, almost invisible join.
What is the best yarn for granny squares?
The best yarn for granny squares is usually a medium-weight, worsted yarn made of acrylic or cotton. These yarns are durable, easy to work with, and come in a wide variety of colors. They also hold their shape well, making them ideal for creating consistent squares.
How do I stop my granny square from curling?
To stop your granny square from curling, ensure your tension is even and not too tight. Blocking the square by wetting it and pinning it flat to dry can also help. Additionally, using the correct number of chains in the corners and ensuring your stitches are consistent will prevent curling.

