


![[Must-have] Knitting Yarn and Wire Set - Caydo](http://www.caydo.com/cdn/shop/files/3_4c349a4b-7e4d-4fa8-b6df-6561cf08410c.jpg?v=1731059827&width=298)
![[Must-have] Knitting Yarn and Wire Set - Caydo](http://www.caydo.com/cdn/shop/files/1_c1a8ec5f-79f5-4c02-b655-aaba689678cf.jpg?v=1731060862&width=298)


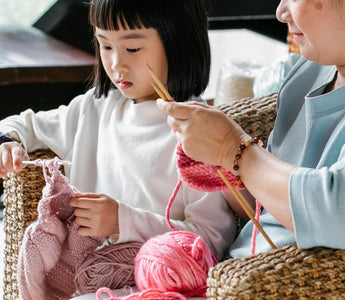
Learning how to knit is a timeless craft that transforms simple yarn into beautiful, functional items with just two needles and a few basic techniques.
We'll walk through the basic steps—from selecting your materials to casting off your finished piece. Follow these five steps, and you'll be proudly wearing your handmade creation sooner than you might think.
Let's begin!
Step 1: Gather Your Supplies

First, let's round up everything you'll need before diving in.
Choose the Right Yarn
First things first—you'll need some yarn. Here's what to look for:
- Type and Weight: Grab a medium (worsted weight #4) yarn—it's the perfect thickness for beginners.
- Material: Wool is naturally warm and forgiving for new knitters. Acrylic is budget-friendly and comes in many colors.
- Appearance: Choose solid colors rather than variegated yarns—they make it easier to see your stitches.
- Check the Label: Look for the recommended needle size (usually US 7-9 for worsted) and care instructions.
Use Beginner Knitting Needles
Now that you've got your yarn, let's pair it with the right needles:
- Straight needles (10-14 inches long) are perfect for scarves
- Size US 7-9 works well with worsted weight yarn
- Bamboo or wood needles are great for beginners (yarn won't slip as much!)
Don't splurge on fancy needles yet - basic ones do the job
Additional Knitting Tools
To complete your knitting toolkit, add these helpful items:
- Yarn needle (the big-eyed blunt one) for finishing touches
- Scissors
- Tape measure
- Stitch markers to keep track of important spots
- Yarn winder to create tidy yarn cakes that don't roll away
With these supplies ready, you're all set to move on to creating your first stitches!
Need quality knitting supplies to get started? Explore Caydo's complete collection of knitting and crocheting tools for everything from premium needles to yarn organizers!
Step 2: Master the Slip Knot and Cast On
Before you can start knitting, you need to get those stitches onto your needle. Let's break this down into simple steps:
Creating Your First Slip Knot
Every knitting project begins with a slip knot—here's how to make one:
1. Make a loop by crossing the working yarn (attached to the ball) over the tail

2. Push your finger through, grab the working yarn, and pull through to form a loop

3. Place this loop on your needle and gently tighten (not too tight!)

Congratulations—this is your first stitch and the foundation for all others!
Long-Tail Cast On Method

With your slip knot in place, you're ready to add more stitches using the long-tail method:
- Pull out a long tail of yarn
- Hold the needle in your right hand with the slip knot near the tip
- Form an "OK" sign with your left hand, tail over thumb, working yarn over index finger
- Scoop under thumb yarn, over and down through the loop, then catch the index finger yarn
- Repeat this motion smoothly.
Counting Your Stitches
Before moving forward, take a moment to verify your stitch count:
- Count carefully—your slip knot counts as the first stitch
- For accuracy, lay your needle flat and point to each stitch as you count
Don't worry if you mess up—just pull everything off and start again. With your foundation row complete, you're now ready to learn the basic knit stitch in the next step!
Step 3: Basic Knit Stitch

Now comes the fun part—learning the actual knitting technique! Let's break down the basic knit stitch:
Proper Hand Positioning

Here's the step-by-step process to create your first knit stitch:
- Hold the needle with cast-on stitches in your left hand, empty needle in your right
- Insert right needle from left to right through the front of the first stitch
- Wrap the working yarn counterclockwise around the right needle
- Pull the right needle with wrapped yarn through the loop
- Slide the old stitch off the left needle while keeping new stitch on right
Congratulations! That's one knit stitch (or "k1" in pattern language). Repeat these motions for each stitch across your row.
The Continental vs. English Method
As you get comfortable with the basic motion, you might notice there are two main ways to hold your yarn:
- English Method: Hold yarn in your right hand and "throw" it around the needle
- Continental Method: Hold yarn in left hand and "pick" it with the right needle
Try both to see which feels more natural—there's no right or wrong choice, just what works for your hands! Whichever style you choose, consistency is key to developing muscle memory.
Maintaining Even Tension

Once you've chosen your method, focus on creating consistent stitches:
- Aim for a goldilocks grip—not too tight, not too loose
- Don't worry if your first few rows look uneven (everyone's do!)
- For beginners, the garter stitch (knitting every row) is forgiving and lies flat
- Count your stitches frequently to make sure you're not accidentally adding or dropping any
Keep practicing this motion and soon it will become second nature.
Step 4: Finishing Your Rows

After knitting across a complete row, you'll need to turn your work and keep going. Here's how to maintain your momentum:
Turning Your Work
When you reach the end of your row, follow these steps to transition smoothly:
- Simply flip your knitting around horizontally
- Move the needle with all your stitches to your left hand
- Hold the empty needle in your right hand
- Position your yarn so it comes from the stitch nearest the tip
- Begin knitting the next row
Be gentle when turning—many beginners pull the yarn too tight at the edges, which can cause your stitches to "cinch in" at the sides.
Avoiding Common Row Mistakes
Keep an eye out for these typical beginner issues as you work:
- Counting confusion: Check your stitch count regularly to make sure it's consistent
- Accidental increases: Be careful not to create extra stitches by wrapping yarn between stitches
- Dropped stitches: Ensure all stitches transfer properly when turning your work
- Uneven edges: Don't worry if your edges look a bit wobbly at first—this improves with practice
Reading Your Knitting
Developing the ability to "read" your work helps you catch and fix mistakes early:
- For garter stitch (knitting every row), you should see horizontal ridges forming
- Each ridge represents two rows of knitting
- Scan for any holes or unusual bumps that might indicate a mistake
- Notice your edges—they should be relatively straight
- Compare your current row to previous rows to ensure consistency
Step 5: Binding Off and Finishing Touches

Follow these steps to safely secure your stitches:
- Knit the first two stitches of your final row
- Using your left needle, lift the first stitch over the second stitch and off the right needle
- Knit one more stitch, then lift the previous stitch over it
- Continue this pattern: knit one, lift previous stitch over
- For the last stitch, cut your yarn (leaving a 5-6 inch tail) and pull through
Keep your tension relaxed during this process—a too-tight bind off will make your stitches pucker or lose stretchiness.
Weaving in Loose Ends
With your stitches secure, it's time to hide those yarn tails:
- Thread each loose end onto a tapestry needle
- Work the needle through the wrong side (back) of your stitches
- Weave in different directions for 3-4 inches to secure firmly
- Trim any excess after weaving, leaving just a tiny bit
Taking time with this step ensures your stitches won't unravel with wear and adds a professional finish to your work.
Want to take your knitting to the next level? Check out our selection of knitting machines to create projects faster and explore new techniques!
Conclusion on How To Knit
Congratulations! You've just unlocked the fundamental skills of knitting in five simple steps. What begins with yarn and two needles can transform into endless creative possibilities—from cozy home decor to stylish accessories.
As your hands become more familiar with these movements, you'll find a rhythm that many knitters describe as almost meditative. Each stitch builds your confidence and brings you closer to mastering this timeless craft.
Ready to add another craft to your creative toolkit? Discover the magic of hook and yarn with our beginner-friendly guide on how to crochet and double your making powers!
Frequently Asked Questions about How To Knit
How to knit step by step?
Gather supplies: knitting needles (US 8-10) and medium-weight yarn. Cast on 20-30 stitches using the long-tail method. Create knit stitches by inserting right needle into a stitch, wrapping yarn, and pulling through.
What is the basic process of knitting?
Knitting follows four main steps: casting on to create your first row, working stitches across rows to build fabric, binding off to secure your work, and weaving in ends. Most beginners start with garter stitch (knitting every row). Your fabric grows with each completed row until you reach desired length.
Is knitting easy for beginners?
Knitting is accessible but requires initial patience to develop muscle memory. Most beginners can learn the basic knit stitch in one session and start making simple projects immediately. Common early challenges include maintaining even tension and keeping track of stitches.
How do you hand knit for beginners?
Hold needle with cast-on stitches in left hand, empty needle in right. Insert right needle into first stitch, wrap yarn counterclockwise, then pull through to create a new stitch. Repeat this motion for each stitch, maintaining even tension throughout your work.

